[private role=”visitor-only”]Sorry, this Post is only for Contributors eyes[/private]
[private role=”subscriber-only”]Sorry, this Post is only for Contributors eyes[/private]
[private role=”contributor”]
If you can see this, it means you are a Contributor or a Coordinator. So you can write a new Post if you want, but how can you do it?
Well, writing a Post is easy. Here are the few steps you have to follow:
Creating a Post
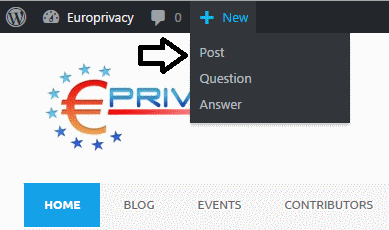
Check the black row you see on the top of every page on this site; you will see a “+ New” indication. Hover the mouse on it, and a drop-down menu will appear. Click on “Post”
This is what you will see:
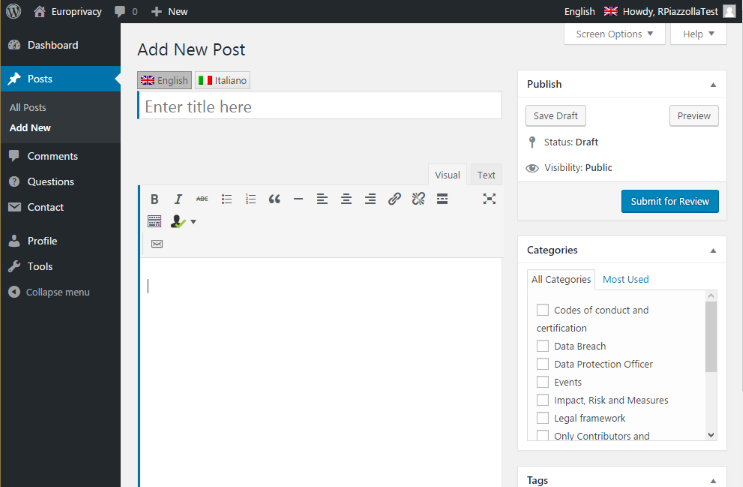
No panic, let’s divide this big screen into a few small sections, easy to understand:
Choosing the main language
You will probably choose to write your post using your main language. The only thing to do now is to click on the button of your language of choice.
![]()
We will be back to these buttons later, but for now, let’s see the next section.
Give a title to your post
Right below the language buttons, there is a big text box. Since inside the text box you can read “Enter title here”, it’s not too hard to know where you have to write your Post title.
Here is the result:

It’s time to save all your efforts
Saving your work it’s easy. You can do it anytime, using the controls inside the “Publish” box on the right side of the page, containing only 3 buttons: “Save Draft“, “Preview“, and “Submit for Review“.

If you only see the box title, without buttons, no panic. Probably you misclicked and closed it, but you can open it again simply clicking the little arrow on the right.

Since you didn’t finish to write your post yet, we can agree that this is a draft. So, to save your work, simply click on the “Save Draft” button. As soon as you do it, something called Permalink will appear just below your Title:
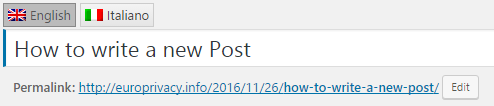
This will be the URL where the Europrivacy site will show your post when it will be finally published. But for now this is a draft, and you only wrote the title, so we can ignore the Permalink, and start writing the Post body for real.
Writing the Post body
Right below the Permalink, there is the Editing section. This is where you will write the body of your Post.
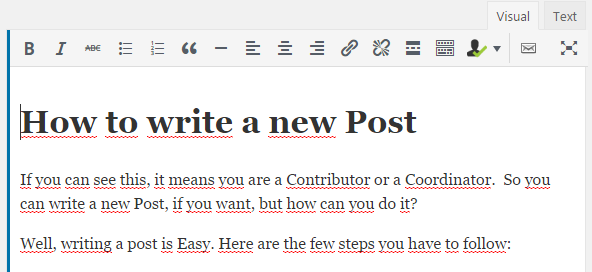
This is the “Visual” view, as you can see checking the selected Tab on the top right. While you are in this view, you can write your post seeing exactly what the final user will see when he will read your Post. If you misclick the “Text” tab, you will see the post HTML code but, if you’re not an HTML expert, there is no reason to use that view; so simply click back on the “Visual” tab.
Right above the blank space where you are writing your Post, there is the Format/Editing Toolbar. Try to experiment with the buttons there to see what you can do with them. In the end, it’s not too different by the toolbar you are using with your preferred Word Processor.
Just one hint: don’t forget to click the Toolbar Toggle button, to open the second row of the toolbar. Otherwise, you won’t be able to insert a section title inside your Post:

I didn’t finish yet, but I want to go home now
Well, just click on the “Save Draft” button (inside the Publish box, in the top right corner), as you did before, then you can close the browser windows and turn off your computer without losing your work.
Can I see my Post on the site, exactly as the user will see it after publishing it?
Sure. Just click on the “Preview” button (inside the Publish box, in the top right corner). It’s near the “Save Draft” button you already used twice.
The Post preview will open in a new Tab of your browser. But don’t give away that URL, because only you (the Post creator) can use it. Everyone else won’t see anything there until the post will be finally published.
I’m back from home and I want to continue editing my Post. How can I do it?
Follow this link: https://blog.europrivacy.org/wp-admin/edit.php. There you will find all the posts you wrote, both published and draft:
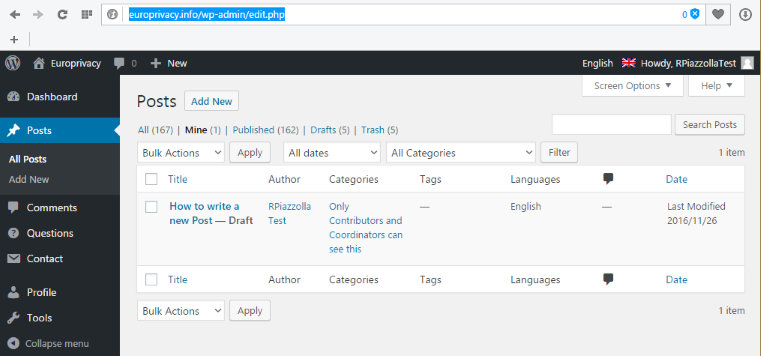
You can filter this list, by date, category, and status. When you find the Post you want to edit, move the mouse pointer on it, and a submenu will appear:
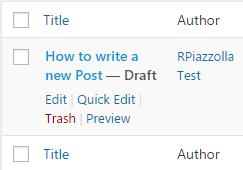
Click “Edit“, and you will be back on the Edit page.
I finally finished writing my post. What now?
We are almost there. We just have to add a Category and a few Tags
Choosing a Category
The Category you are going to assign now will be used by the Europrivacy site to insert your post in a specific Posts list.
If you look at the site homepage, you will see on the right side a list of Categories. Well, choosing a Category inside the editing page, you will insert your post in one of those lists.
Now, if you look on the right side of the Post you are writing, you will see the Category box.
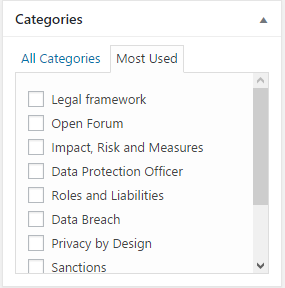
I suggest that you select the “Most Used” tab, clicking on it. Use the “All Category” tab, only if you don’t find the right Category in the “Most Used” list.
Anyway, select only the right Categories for your post, checking them. Usually only one is the right one, but sometimes two or more can be checked. Just don’t check too many of them.
Choosing the right Tags
 Tags are keywords or short key phrases used to aggregate different Posts having contact points. Usually, you can choose them simply reading your post, and picking all the words you would use to search the post itself if you were using Google to search for it.
For example, if your Post contains the name of someone, this is a very good Tag. Use the name and the surname of that person as a single Tag.
Then pick from your text all the words or short phrases that could be keywords for a search. Tags can be one, two or three words long, but don’t use Tags longer than three words, because almost no one writes more than three words doing a search on Google.
Anyway, the Tags rule is the opposite of the Category one. The more Tags, the better.
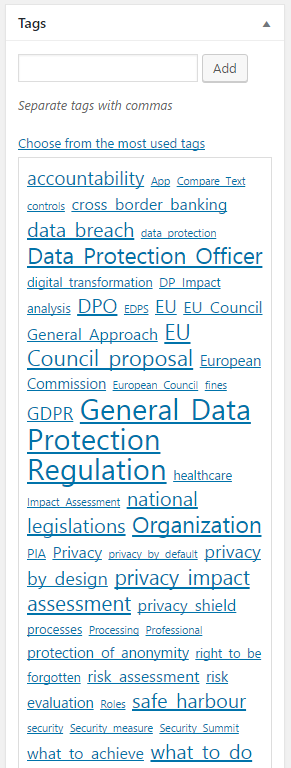
Tags can be inserted using the Tags box, right below the Category Box you just used.
You can simply write your tags on the white space in the Tags box, using a comma to separate the different tags. Or you can click on the “Choose from the most used tag” link right below, to open a list of tags, and click on them to add them to your Tag list.
When you’re done, click on the Add button. And that’s all with the Tags.
Are we there yet?
Not yet, sorry. You have to translate your post.
The other languages
Do you remember when at the beginning you have chosen your language? Well, before the post can be published, someone has to translate it into the other language. If you know at least one of the other languages, we’d ask you to try a translation.
Doing that is easy. If you scroll back to the top, you will see the Language buttons
![]()
Click on the other one, and both the title and the body of your post will disappear.
Don’t worry, nothing is lost, you simply have to fill the blank spaces with the right translation of the same sections on the other language.
You can click back and forward between the languages, or you can select your entire post, copy it on the new language, and translate it one paragraph at a time.
If you are not fluent in the other language or don’t know it at all, you can ask for a translation, but this will slow the publishing process, and your Post will be queued with all the others needing a translation. So if you can translate it by yourself, please, do it, or at least just try. It really helps!
Are we there yet? Please? Pretty Please?
Yes, it’s done. go back to the Publish box, on the top left of the editing page, and click the “Submit for Review” button. Now you can be proud of your hard work!
A coordinator will check your post as soon as possible, and you will soon see it online, in all its glory.
[/private]